> ## Documentation Index
> Fetch the complete documentation index at: https://university.gumloop.com/llms.txt
> Use this file to discover all available pages before exploring further.

# Bring Your Agent Where You Work | Getting Started with Gumloop

> Deploy your Gumloop agent to Slack and email so your whole team can use it without leaving the tools they're already in.

<div id="gumloop-auth" data-token={user?.accessToken || ''} data-email={user?.email || ''} style={{display: 'none'}} />

<div className="lesson-page">
  <div className="lesson-breadcrumb">
    <a href="/">University</a>

    <svg xmlns="http://www.w3.org/2000/svg" width="14" height="14" viewBox="0 0 24 24" fill="none" stroke="currentColor" strokeWidth="2" strokeLinecap="round" strokeLinejoin="round" className="chevron">
      <path d="m9 18 6-6-6-6" />
    </svg>

    <a href="/getting-started-with-gumloop/what-is-gumloop">Getting Started with Gumloop</a>

    <svg xmlns="http://www.w3.org/2000/svg" width="14" height="14" viewBox="0 0 24 24" fill="none" stroke="currentColor" strokeWidth="2" strokeLinecap="round" strokeLinejoin="round" className="chevron">
      <path d="m9 18 6-6-6-6" />
    </svg>

    <span className="current">Bring Your Agent Where You Work</span>
  </div>

  <div className="lesson-video">
    <div className="lesson-video-aspect">
      <iframe src="https://player.vimeo.com/video/1190842667?h=0c58ec21e6" allow="autoplay; fullscreen; picture-in-picture" allowFullScreen />
    </div>
  </div>

  <div className="lesson-transcript">
    <input type="checkbox" id="transcript-toggle" className="transcript-toggle" />

    <label htmlFor="transcript-toggle" className="transcript-header">Video transcript</label>

    <div className="lesson-transcript-body">
      <p>You now have an agent. You've built something great. Now let's bring that agent to where you work, to where work actually happens, in Slack and email.</p>
      <p>So first up, Slack. It's where you work, and your colleagues are already all there. So to add our sales agent from the previous lesson to our sales channel, we'll click on "Add to Slack" right here. I can pick the channel where this agent should live. For us, that's going to be the sales channel.</p>
      <p>Now @Gumloop in this channel is associated to this agent. And now I can ask @Gumloop "generate a sales report," and the agent will start working, just like it would on the web.</p>
      <p>If I want to continue the conversation with something like "highlight reps with under 500K in pipeline," I can do that in the thread, and that'll continue the conversation as if I'm chatting on the web.</p>
      <p>And in Slack, colleagues can chime in. They can also start using this agent directly from this channel by tagging @Gumloop in the main channel.</p>
      <p>You can also give your agent a specific tag, a specific handle, like @sales-helper. Which also means that once you give it a tag, you can have multiple agents in the same channel working alongside you.</p>
      <p>Another place where work happens, hate it or love it, is email. You can bring your agent there too by giving it a Gumloop agent email address in Inbox. Any email sent to this address by you or your team, anyone with access to this agent, can have it do work for you.</p>
      <p>So here I've got an inbound demo request from a potential customer, and I've forwarded this to my agent for it to start qualifying this lead for me. Just like when we @Gumloop in Slack, when we email our agent, we're starting a thread in the web UI. It's exactly like chatting with it.</p>
      <p>So if I open up the agent, I can see it's received the email and it's working away on qualifying that lead. Once it's done, it'll respond to the original email.</p>
      <p>Now you and your whole team can interact with your agents where you already work. Need to research that person emailing you? CC your agent or forward their information through email. Your analytics for your web traffic can be sent to Slack, where your team is already talking about it.</p>
      <p>Add your agent where you're already working and let it start doing work for you.</p>
    </div>
  </div>

  <div className="lesson-card">
    <h1 className="lesson-title">Bring Your Agent Where You Work</h1>

    <p className="lesson-desc">Deploy your agent to Slack and email so your whole team can use it without leaving the tools they're already in.</p>

    <div className="lesson-content">
      <p>Building an agent is step one. The real value comes when your team can use it without opening a new tab. Gumloop lets you deploy agents directly into Slack and email, the places where work actually happens.</p>

      <h2>Add Your Agent to Slack</h2>

      <p>Open your agent and click <strong>Add to Slack</strong>. Pick the channel where the agent should live. Once connected, anyone in that channel can tag <strong>@Gumloop</strong> to start a conversation.</p>

      <img src="https://mintcdn.com/gumloop_university/027Bi86hQDHe_8hV/images/add-to-slack.webp?fit=max&auto=format&n=027Bi86hQDHe_8hV&q=85&s=57a1976130de8a14067e9aeba5e23b6c" alt="Connect Slack dialog showing the setup steps" style={{borderRadius: '12px', border: '1px solid #e5e7eb', marginTop: '16px', marginBottom: '16px', maxWidth: '100%'}} width="1220" height="682" data-path="images/add-to-slack.webp" />

      <p>
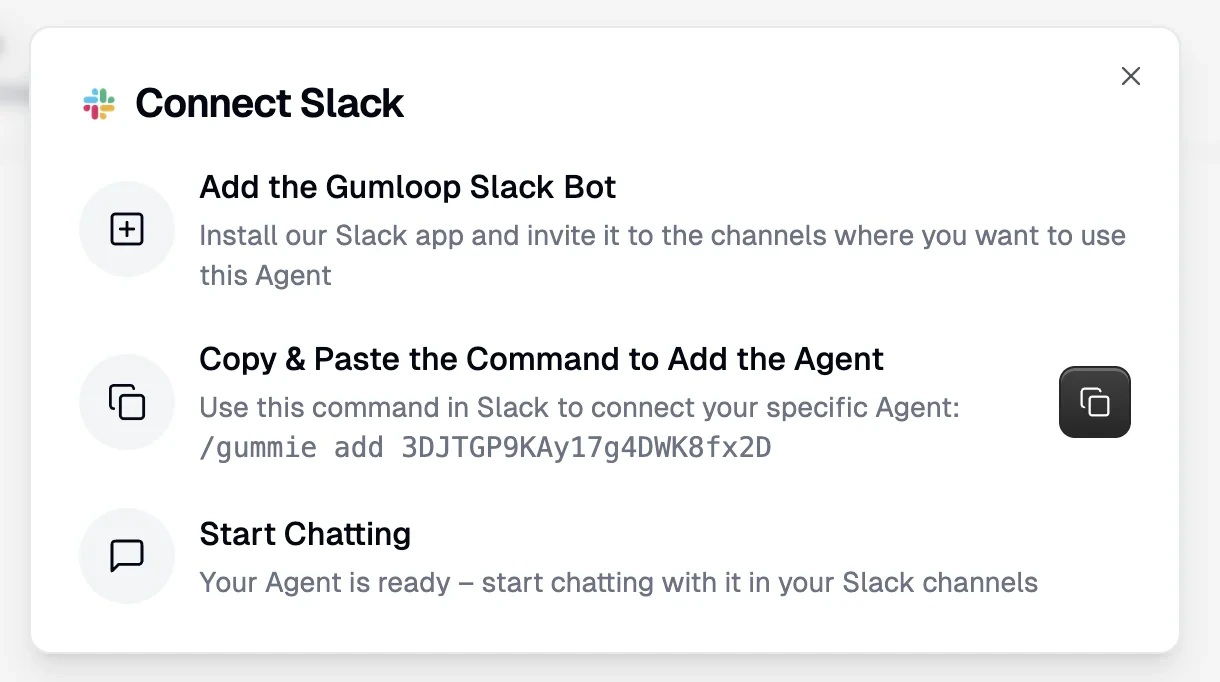
The agent responds in a thread. Reply in the thread to continue the conversation, just like chatting on the web. Every new @Gumloop tag in the main channel starts a fresh conversation.</p>

      <p>Colleagues can chime in on existing threads or start their own. Build the agent once, and your whole team uses it.</p>

      <h3>Custom Handles</h3>

      <p>You can give your agent a custom handle like <strong>@sales-helper</strong> instead of the default @Gumloop tag. This also means you can have <strong>multiple agents in the same channel</strong>, each with its own name.</p>

      <p><a href="https://docs.gumloop.com/core-concepts/custom_slack_app" target="_blank" className="lesson-try-link">Step-by-step guide for custom Slack apps <svg xmlns="http://www.w3.org/2000/svg" width="14" height="14" viewBox="0 0 24 24" fill="none" stroke="currentColor" strokeWidth="2" strokeLinecap="round" strokeLinejoin="round"><path d="M7 17L17 7" /><path d="M7 7h10v10" /></svg></a></p>

      <h2>Add Your Agent to Email</h2>

      <p>Your agent can also have its own email address through Gumloop's Inbox feature. Any email sent to that address starts a conversation with the agent, just like tagging it in Slack.</p>

      <p>Forward a demo request for lead qualification. CC your agent on a thread to get a summary. Send it customer info and ask for research. When the agent finishes, it replies to the original email.</p>

      <h2>Where to Use Each</h2>

      <table>
        <thead>
          <tr><th>Channel</th><th>Best for</th></tr>
        </thead>

        <tbody>
          <tr><td><strong>Slack</strong></td><td>Team collaboration. Everyone in the channel can use the agent and see each other's conversations.</td></tr>
          <tr><td><strong>Email</strong></td><td>Forwarding inbound requests, getting research done, or triggering work from outside your team.</td></tr>
          <tr><td><strong>Web</strong></td><td>Direct interaction when you need the full Gumloop UI.</td></tr>
        </tbody>
      </table>

      <form className="quiz-widget">
        <h3>Quiz: What happens when you tag @Gumloop in a Slack channel?</h3>

        <input type="radio" name="q-quiz" id="q-q0" className="quiz-input" />

        <input type="radio" name="q-quiz" id="q-q1" className="quiz-input" />

        <input type="radio" name="q-quiz" id="q-q2" className="quiz-input" />

        <input type="checkbox" id="q-check" className="quiz-check-input" />

        <label htmlFor="q-q0" className="quiz-option">
          <span className="quiz-circle" />

          <span>It sends a notification to Gumloop support.</span>
        </label>

        <label htmlFor="q-q1" className="quiz-option">
          <span className="quiz-circle" />

          <span>It opens the Gumloop web app in a new browser tab.</span>
        </label>

        <label htmlFor="q-q2" className="quiz-option quiz-correct">
          <span className="quiz-circle" />

          <span>It starts a new conversation with the agent in a thread, and you reply in the thread to continue.</span>
        </label>

        <div className="quiz-explain-correct quiz-explanation">
          Correct! Every @Gumloop tag starts a new conversation thread. The agent responds there, and you continue the conversation by replying in the thread.
        </div>

        <div className="quiz-explain-wrong quiz-explanation">
          Not quite. Think about how Slack conversations work with threads. What happens when you tag someone in a channel?
        </div>

        <div className="quiz-actions">
          <label htmlFor="q-check" className="quiz-check-btn">Check</label>
          <button type="reset" className="quiz-reset-btn">↺ Reset</button>
        </div>
      </form>
    </div>
  </div>

  <div className="lesson-nav-grid">
    <a href="/getting-started-with-gumloop/building-your-first-agent" className="lesson-nav-card">
      <span className="nav-label">
        <svg xmlns="http://www.w3.org/2000/svg" width="14" height="14" viewBox="0 0 24 24" fill="none" stroke="currentColor" strokeWidth="2" strokeLinecap="round" strokeLinejoin="round">
          <path d="M19 12H5" />

          <path d="m12 19-7-7 7-7" />
        </svg>

        Previous Lesson
      </span>

      <span className="nav-title">Build Your First Agent</span>
    </a>

    <a href="/getting-started-with-gumloop/teach-your-agents-skills" className="lesson-nav-card lesson-nav-next">
      <span className="nav-label">
        Next Lesson

        <svg xmlns="http://www.w3.org/2000/svg" width="14" height="14" viewBox="0 0 24 24" fill="none" stroke="currentColor" strokeWidth="2" strokeLinecap="round" strokeLinejoin="round">
          <path d="M5 12h14" />

          <path d="m12 5 7 7-7 7" />
        </svg>
      </span>

      <span className="nav-title">Teach Your Agents Skills</span>
    </a>
  </div>
</div>
